I have been slacking as of late and am behind on birthday cards and baby gifts. Cards are easy as Hallmark is my friend but baby gifts are another story. I find it difficult to estimate whether someone will like a handmade gift or if they would prefer store bought. There is nothing I hate more than exhausting my time and efforts on something handmade and gifting it to someone who then gives me "the look." The look that says, "oh, how nice." And not in an excited way, in a "you REALLY SHOULDN'T have" way. That un-approving, judgmental, "I have no idea what I am going to do with this thing" kind of way. For those kinds of instances I would much rather gift someone a little baby outfit or diapers or something to that effect. Every now and again I decide to go out on a limb and "hope." Hope that the recipient will actually be happy that I took the time to make something personal as opposed to buying something "somewhat" personal. It is here that I find myself. I am hoping that the recipient of this gift will like this. This little gem is great in that if the mom isn't appreciative of it, she can at least let the baby play with it. He won't care if there is no label indicating that it came from a brand name. But I think I might have hit the jackpot with this little gem.
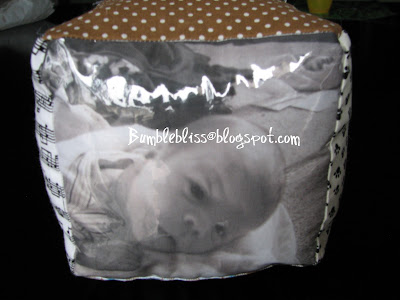
Fabric baby blocks are a great gift for someone for whom it is hard to shop. It is so easy to customize this gift to what you like or what you think its intended would like. The fabric choices, prints, applique's, sizes, etc. all can be changed to your liking. I made mine for under $15 but it left me with excess fabric that I could make two more so the $15 was upfront cost and I suppose it actually cost around $5 to make depending upon the cost of your fabric and fill. I love inexpensive gifts and personalizing it only makes it better. This gift can be an heirloom gift for the child, a decoration for the baby's room, or a toy. Here's what you need to get started.
Supplies
Freezer Paper
Iron
Pressing Cloth
Inkjet Printer
Complimentary Fabric (I used five different prints and one plain white)
Plastic Fabric (optional--to be discussed later)
Embellishments (applique's, bells, lace, etc.)
Sewing Machine
Picture(s)

Decide on the size of your blocks and edit your pictures to that size. I made a 5", 4", and 3" block all with a black and white photo. If you don't intend for the child to play with the block you don't have to use the plastic fabric but make sure you indicate that to the parents. As babies put tend to put things in their mouths I wanted to ensure that one, the ink didn't run and two, that it didn't run into the baby's mouth so I opted for plastic fabric instead of a chemical ink setter. You can encase the entire block in plastic or just the side that is printed. I only did the side that is printed leaving my options open for a textured/tactile block for the baby. With the exception of the fabric on which you are going to print, cut out your fabric pieces with a 1/4" seam allowance. So for the 5" block cut your fabric out to be a 5.5" square. For the 4" block cut a 4.5" square, and for the 3" block cut a 3.5" square. Through my trial and error I used a 1/2" seam allowance and it left too much excess on the sides and encouraged me to improvise my sizing which is why my block isn't as evenly sized as I would prefer. If you are going to add embellishments this is the time to do it. Add lace or applique's to your liking.
Take the uncut fabric that you are printing on and cut it out to 8.5"x11". If it is for a picture it is best to use plain white fabric but you can also print quotes, songs, the baby's birthday or any kind of script on colored fabric. Just make sure that the fabric isn't too dark. Cut out an 8.5"x11" piece of freezer paper. Freezer paper is not the same as wax paper. Freezer paper has one side that is plain paper and one side that is plastic. Place the wrong side of the fabric to the plastic (shiny) side of the freezer paper. Using a pressing cloth to avoid scorch marks or transference from your iron, press the fabric onto the freezer paper making sure that the edges are well pressed together. This will stiffen the fabric allowing you to print directly onto your fabric using an inkjet printer. You could also use printer ready fabric instead of the freezer paper but I was trying to do this on the cheap. This project has the potential to ruin your printer so either be prepared or do this with a cheap printer. I don't recommend doing this with a really expensive printer. I got my HP Deskjet 1055 on clearance at Target for $14 so I don't feel to bad using it to do this project.

I didn't get any special ink or use any special settings on my printer. I used the regular settings but you may need to adjust for the thickness of your fabric. After trial and error I found it best to tape the forward edge of my fabric, meaning the edge that is going into the printer first, to reduce the chance that the printer would split the paper and fabric bond. My printer prints top side up so when the print job comes out I am looking directly at my finished product. Whichever it is for you, place the fabric side in that direction so for me I placed mine fabric side up. I copied and saved my pictures to a word document and then just printed from there.


Because of the size of my pictures I couldn't put them all on the same piece of fabric with the appropriate amount of seam allowance so I reused the same freezer paper and ironed it to the next piece of fabric. Once I had all my pieces ready, it was time to sew. If you are using the plastic fabric, start with that side of the block. I found it helpful to trace the outside line of my picture on the back of the fabric. Place the plastic fabric (PF) on the right side of the picture sandwiched between the picture and one fabric panel right sides in. If you want all the blocks to be the same, work each panel at the same time for each of the three blocks to reduce the need to un-stitch. For example, work all the right side panels first for all three blocks before moving on to the next panel. If you are using the PF I don't recommend pinning because it will leave a hole so be careful. That is one of the reasons I only used the PF for the printed sides. I pinned the sides that were not covered in PF.

Assemble your cubes leaving a hole in one side (preferably not a corner) so that you can turn it right side out and stuff it.
If you want to add a bell or rattle inside the block do it while you are stuffing. Close up the block using a ladder stitch and Voila! An easy, personalized baby gift!
I linked up with Debbie at

This was inspired by Colleen at the
Magic bean. Happy Gifting!
Eve

 Put on as many ribbons as you want. It is all dependent on how full you want it to be when its on. This is what I did. I used 15 ribbons of material tied on for 30 strands sticking out.
  This is what it looks like in her hair. She loves the poof of color and the tiny sparkles on the material. It was made of scraps I had around the house and basic hair elastics. Total cost was under $1 per set.




 Posts
Posts


.JPG)


