Monday, February 28, 2011

My Son wants to be a mad scientist when he grows up.  Because of this we do a lot of fun science around here.  This time we tested what kind of power we could get out of regular produce at our house.  For this project we used galvanized nails, copper wiring, and my Hubby's Ohm meter.  


First we pulled the covering off both ends of the copper and pushed one end into the fruit or veggie. Push the nail into the other and measure. 


We tested a potato, a green apple, a red apple, a lime and a lemon. 


The red apple gave us the highest readings at a full 1.0 volts.  The green apple gave us .98 volts.  The lemon gave us .94 volts. The lime gave us .91 volts.  Lastly the potato gave us .83 volts.   When we linked them all in a row we got a total of 4.03 volts which is enough to run a LED light but we couldn't find one.


It was a lot of fun to learn about power and how we can find it in the simplest places.  We can't wait to try it again on a bigger scale.  We will wait until the garden is putting out extras for that test though. 

XOXO Mist

Saturday, February 26, 2011

Do you ever feel like you are just one person and you alone will not make a difference?  One simple action that can make a difference in your community is as simple as watching the boxes and bags you use every day and clipping out the Box Tops for Education you see.  Each one adds $.10 to the school of your choice and does not cost you anything you are not already doing.  You don't even need to know a kid in a participating school to do your part.  Most any school will take these and turn them into much needed supplies. 

I save every Box Top I see because I know where this money is going.  It just takes an extra second out of your day and adds funds to your local education system.  I'm talking about the bigger picture here.  Schools are funded with our taxes and they benefit everyone.  These schools are educating our future business leaders, our future doctors, lawyers, policemen, our future presidents.  These schools are creating our future and every penny helps. 

Did you ever want to make a difference?  Now is your chance.  Clip those Box Tops and find a school that needs them today.

Visit the offical website here.


XOXO Mist

Friday, February 25, 2011

If you have kids that love to color, then you have tiny bits of crayons that most people just throw away.  I know my kids get new boxes at the beginning of the school year, for birthdays, Easter, Christmas, and at other random times throughout the year. Instead of tossing the crayons that "spontaneously broke by themselves while my child was holding it," I collect these little bits because my kids have a tendency not to want to use them because they are broken. I know my kids are not the only ones that have broken crayons so I contacted my local elementary school. What better place to find broken crayons, right? Turns out that the school was just going to throw these old, broken crayons away so I asked for them and they bagged them up and gave them to me. Now I have a stash of broken crayons that I can use to make more crayons.

The hardest part of this whole project is unwrapping the crayons. For that, I turned to my little helpers. I took a knife and scored the sides of the paper and let the kids sit and peel for a while. We also broke them into pieces that fit into the cups of my tin.  I had this nightmare thought that if the crayon pieces were larger, they might somehow escape to the floor of my oven. That sounds like a mess I would never be able to clean entirely.

We organized them by the colors we wanted them to melt with and put them in an old muffin tin.  I only use this tin for crayons.  If you actually bake with yours then you will want to line them with foil cups.  Ive never done it that way but It seems like paper wouldn't work since the crayons would stick.


When all the unwrapping fun is done and the cups are filled then it's time to pop them in the oven and turn it on.  200 degrees on the center rack. 

Melt them until they are flat on the top and completely blended. Resist the urge to touch the melted, gooey mess. I know, it just calls out to you but if you want pretty crayons, you'll thank me. I tried to poke one of the pieces down when it was almost done to make mine pretty and a few bumps were left on the top.  For my efforts I was rewarded with a dent in my crayon and some brightly colored wax on my finger. All in all it took me about 30 minutes but my kids peeked a few times.  Just start checking after 15 minutes so you don't burn them. 


Now it's time to let them cool and solidify. It's a cold day here so I stuck ours outside to cool.  When they are cool enough just pop them out like an ice cube tray and voila! You have some custom crayons that will be harder for your most ardent destroyer to break.


Just for kicks I put all the brown crayons into my chocolate bar silicone pan.  It almost looks edible.  I might try to feed it to my Hubby later. 

XOXO Mist

Tuesday, February 22, 2011

I have heard these called Chocolate Crinkle Cookies but in my house they are Chocolate, Chocolate Chip Cookies. I know that is a lot to say in one breath but it seems to suit them better than "Crinkles." This cookie is not for the faint of heart. This rich, cocoa cookie is filled with mini chocolate chips and dredged in powdered sugar. It is a favorite at my house and one that I can't seem to keep around very long.

The thought of making cookies often hits me at night, just before bed. It may be in part due to the fact that the time after dinner and bedtime routines is my time to reflect and think about what I have done that day and what I have to get done tomorrow. I make my cookie dough at night and leave it in the refrigerator over night to chill. I don't even have to cover it. In the morning I bake my cookies after the little ones have gone to school. That way, I always get the first taste. I think these cookies are best eaten the next day. That is how I like it.

Ingredients

3/4 c     Melted Butter
1 c         Sugar
2            Eggs
1/2 c    Unsweetened Cocoa Powder
2 tsp     Vanilla
2 c         Flour
1 tsp     Baking Powder
1 tsp     Baking Soda
1/2 tsp Salt
6 oz       Mini Semi-sweet Chocolate Chips
3/4 c     Confectioner's Sugar

Mix butter, sugar, and cocoa together. Whisk in eggs and vanilla. In a separate bowl, sift together flour, baking powder, baking soda, and salt. Slowly add dry ingredients to chocolate mixture. Do not over mix. Chill dough in refrigerator for at least 2 hours. Form into 1 inch balls and roll in confectioner's sugar. Bake at 350* on ungreased cookie sheet for 10-12 minutes. Remove from oven and let sit on cookie sheet for at least 5 min. Transfer to cooling rack. Enjoy!!

*Hint* I use parchment paper to make cleanup easier as these are quite messy.


                              Eve

Monday, February 21, 2011

When you have a baby in the house you understand the need for a good budget.  Payday never seems to come soon enough when you need diapers or wipes and every penny counts just a little bit more.  It seems like you can run out of baby wipes weekly even though you tried to plan ahead and buy the jumbo box at your local warehouse store. Sometimes you may find that your child's skin is sensitive to the name brands or perhaps you just want to control what touches your baby's skin. So instead of trying out every brand of baby wipes, (which, in itself is an expensive endeavor,) why not make your own? It's actually quite simple.


Here is what you need.

A container the size of half the length of a roll of paper towels
A roll of good paper towels
Baby shampoo
Baby oil
Water

Instructions

Cut the roll of paper towels in half and remove the cardboard tube from the inside. If you've ever bought Clorox wipes then you'll understand what this is going to look like. Put the half roll in the plastic container cut side down.  It helps at this point to just barely pull the center paper towel up a bit since this is what you will be pulling.

Get 2 cups of warm water, 2 tablespoons of baby bath or shampoo and 1 tablespoon of baby oil.  Mix it all up and pour it over the paper towels.  Put the lid on the container and let it sit until it is saturated. 

Now they are customized to your child and ready to use.


XOXO Mist

Sunday, February 20, 2011

If ever I could get rid of one chore, it would be laundry.  I feel like I do load after load only to find the next day that it all needs to be done again.  I have no idea how large families do it. I applaud you!  I do know though, I am saving a fortune on the laundry detergent I use and that makes a big difference in the 520 or so loads I do a year.  My laundry detergent does not smell like a spring morning, a fresh waterfall or a mountain spring.  My laundry detergent does not smell at all; but it leaves my clothes that way too. 


Here is what you will need.

Ingredients

1/2 C Super Washing Soda ( Not baking soda )
1/4 C Borax
1/2 Bar of laundry soap
Water

Items

A 5 gallon bucket
Bags ( Optional but helpful )
A quart jar ( Again helpful )
Wisk or Spoon ( I like the wisk )
A bottle to store it in.


When I buy the ingredients for this project, I measure them out and put them in individual sandwich bags.  One box of Borax will have enough to make 41 batches, one box of Washing Soda will make 12 batches, and one bar of Laundry soap will make 2 batches.

Prep Work Step one--Grate the laundry bar.

I have a cheese grater that I use just for the laundry bar. You can use a food processor but it is not necessary. I prefer not to mix food appliances with "work" appliances. Shred the bar using the large "cheese grate" side.

Though this next step is not entirely necessary, it is helpful. If you take the time to separate everything out then your subsequent batches go more smoothly and you only have to do this once.

Prep Work Step two--Separate

Take a sandwich bag and fill it with 1/2 c Washing Soda. Fill another bag with 1/4 c Borax. Fill a third bag with half of a laundry bar. Place these three bags into a fourth bag. This will keep them all together and ready to use when you make the next batch of soap.  Repeat this process for the rest of your ingredients. If you buy one box of Borax, three boxes of Washing Soda and 18 laundry bars you will have made more than an 8 year supply of laundry soap. All that's left to do is add water when you need another batch. 

This is what it looks like when I have the Borax and Washing Soda measured and bagged up. In the bag I have the Washing Soda, Borax and Laundry bar soap. 

INSTRUCTIONS...

Get the 5 gallon bucket. Take one of the prepared laundry soap kits and put the entire contents of the laundry bar into the bucket. Fill the quart Mason jar with water, pop it in the microwave and get it hot.  Add the hot water to the bucket with the grated soap bar.  Stir this up and let it sit a minute. Add another jar of hot water at this point or soon after. Time is not imperative in this process.  I am usually doing a few other things while I make up the soap so go load the dishwasher or something and let it sit.  Stir occasionally until the laundry bar is dissolved. I'd love to say I have figured out by now how long it will take but it depends on how well you stir, how old the soap is, how hot your water is, and plain old luck of the draw.  Add another jar of hot water and the final two bags of powder from your kit. Get your wisk and stir.  It will clump a bit but stir through it.  From here on out you just add water and stir, then add water and stir.  When you get it about one third of the way full, just fill the bucket as close to the top as you are can while still able to stir.  Let it sit 24 hours.  At this point it is ready to use.  1/2 cup per load.  It tends to separate so either shake it or stir it up depending on how you store it.  Now you have about 160 loads worth of laundry soap ready to go.

You can add fragrance if you want, or stain helpers like Shout.  None of it is necessary.  Sometimes I end up with free samples that I add in just to switch things up a bit. 

I don't have the space by my washing machine to keep a bucket so I put the soap into 10--2 Liter bottles.  I also have an old detergent bottle and the lid happens to measure the 1/2 cup I need per load so I pour the 2 Liter into it and keep it full to use.  

If you are lucky enough to have one of those fancy HE front loaders then this soap is perfect for you but just use 1/4 C instead of the full 1/2 C.  

Why do I go to all the work to make it myself?  It's all in the numbers. ( These are the numbers as of today and tend to change from time to time. )  I do about 520 loads a year so this is based on my usage. 

I priced my old favorite soap, in its beautiful orange bottle and fantastic scent, online and the best deal I could find on Amazon was $13 for 52 loads. That breaks down to  $.25 a load for a total of $130 a year.

 The cheapest detergent at the store is $2.95 for 50 loads which breaks down to $.059 a load or $30.68 a year.

Including the Washing Soda, Borax, Laundry Bar Soap, and the bags needed to separate it all, I spend $.0133 a load or $6.92 a year.  

I know the savings don't look huge but I am a firm believer that pennies add up to make huge savings.  The other blessing is I have years, or more likely decades, of laundry soap in my house ready to make up taking up minimal storage space.  


  XOXO Mist

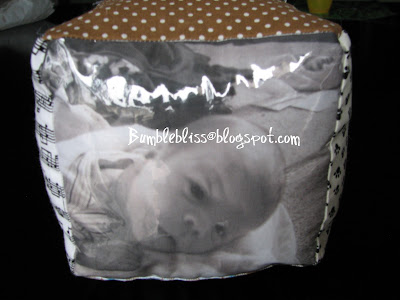
I have been slacking as of late and am behind on birthday cards and baby gifts. Cards are easy as Hallmark is my friend but baby gifts are another story. I find it difficult to estimate whether someone will like a handmade gift or if they would prefer store bought. There is nothing I hate more than exhausting my time and efforts on something handmade and gifting it to someone who then gives me "the look." The look that says, "oh, how nice." And not in an excited way, in a "you REALLY SHOULDN'T have" way. That un-approving, judgmental, "I have no idea what I am going to do with this thing" kind of way. For those kinds of instances I would much rather gift someone a little baby outfit or diapers or something to that effect. Every now and again I decide to go out on a limb and "hope." Hope that the recipient will actually be happy that I took the time to make something personal as opposed to buying something "somewhat" personal. It is here that I find myself. I am hoping that the recipient of this gift will like this. This little gem is great in that if the mom isn't appreciative of it, she can at least let the baby play with it. He won't care if there is no label indicating that it came from a brand name. But I think I might have hit the jackpot with this little gem.


Fabric baby blocks are a great gift for someone for whom it is hard to shop. It is so easy to customize this gift to what you like or what you think its intended would like. The fabric choices, prints, applique's, sizes, etc. all can be changed to your liking. I made mine for under $15 but it left me with excess fabric that I could make two more so the $15 was upfront cost and I suppose it actually cost around $5 to make depending upon the cost of your fabric and fill. I love inexpensive gifts and personalizing it only makes it better. This gift can be an heirloom gift for the child, a decoration for the baby's room, or a toy. Here's what you need to get started.

Supplies

Freezer Paper
Iron
Pressing Cloth
Inkjet Printer
Complimentary Fabric (I used five different prints and one plain white)
Plastic Fabric (optional--to be discussed later)
Embellishments (applique's, bells, lace, etc.)
Sewing Machine
Picture(s)


 Decide on the size of your blocks and edit your pictures to that size. I made a 5", 4", and 3" block all with a black and white photo. If you don't intend for the child to play with the block you don't have to use the plastic fabric but make sure you indicate that to the parents. As babies put tend to put things in their mouths I wanted to ensure that one, the ink didn't run and two, that it didn't run into the baby's mouth so I opted for plastic fabric instead of a chemical ink setter. You can encase the entire block in plastic or just the side that is printed. I only did the side that is printed leaving my options open for a textured/tactile block for the baby.  With the exception of the fabric on which you are going to print, cut out your fabric pieces with a 1/4" seam allowance. So for the 5" block cut your fabric out to be a 5.5" square. For the 4" block cut a 4.5" square, and for the 3" block cut a 3.5" square. Through my trial and error I used a 1/2" seam allowance and it left too much excess on the sides and encouraged me to improvise my sizing which is why my block isn't as evenly sized as I would prefer. If you are going to add embellishments this is the time to do it. Add lace or applique's to your liking.

Take the uncut fabric that you are printing on and cut it out to 8.5"x11". If it is for a picture it is best to use plain white fabric but you can also print quotes, songs, the baby's birthday or any kind of script on colored fabric. Just make sure that the fabric isn't too dark. Cut out an 8.5"x11" piece of freezer paper. Freezer paper is not the same as wax paper. Freezer paper has one side that is plain paper and one side that is plastic. Place the wrong side of the fabric to the plastic (shiny) side of the freezer paper. Using a pressing cloth to avoid scorch marks or transference from your iron, press the fabric onto the freezer paper making sure that the edges are well pressed together. This will stiffen the fabric allowing you to print directly onto your fabric using an inkjet printer. You could also use printer ready fabric instead of the freezer paper but I was trying to do this on the cheap. This project has the potential to ruin your printer so either be prepared or do this with a cheap printer. I don't recommend doing this with a really expensive printer. I got my HP Deskjet 1055 on clearance at Target for $14 so I don't feel to bad using it to do this project.


I didn't get any special ink or use any special settings on my printer. I used the regular settings but you may need to adjust for the thickness of your fabric. After trial and error I found it best to tape the forward edge of my fabric, meaning the edge that is going into the printer first, to reduce the chance that the printer would split the paper and fabric bond. My printer prints top side up so when the print job comes out I am looking directly at my finished product. Whichever it is for you, place the fabric side in that direction so for me I placed mine fabric side up. I copied and saved my pictures to a word document and then just printed from there.


 Because of the size of my pictures I couldn't put them all on the same piece of fabric with the appropriate amount of seam allowance so I reused the same freezer paper and ironed it to the next piece of fabric. Once I had all my pieces ready, it was time to sew. If you are using the plastic fabric, start with that side of the block. I found it helpful to trace the outside line of my picture on the back of the fabric. Place the plastic fabric (PF) on the right side of the picture sandwiched between the picture and one fabric panel right sides in. If you want all the blocks to be the same, work each panel at the same time for each of the three blocks to reduce the need to un-stitch. For example, work all the right side panels first for all three blocks before moving on to the next panel. If you are using the PF I don't recommend pinning because it will leave a hole so be careful. That is one of the reasons I only used the PF for the printed sides. I pinned the sides that were not covered in PF.


Assemble your cubes leaving a hole in one side (preferably not a corner) so that you can turn it right side out and stuff it.


If you want to add a bell or rattle inside the block do it while you are stuffing. Close up the block using a ladder stitch and Voila! An easy, personalized baby gift!


I linked up with Debbie at 


This was inspired by Colleen at the Magic bean. Happy Gifting!


                                                Eve

Wednesday, February 9, 2011

Since the dawn of civilization, one topic has plagued us as a society. This has caused divisions within the home and brought about bitter feelings--at least at my house. What can this be, you ask? What could be so important as to cause a cataclysmic event dividing a seemingly happy household?

Dinner.

It seems silly to think that "what's for dinner?" could be such a hated phrase within my home. But it is just that. I despise that question because no matter what my answer, it is never right. Someone is always turning up their nose at me. "It's too spicy, it's too bland, I don't like pasta, I don't like that!" ARGH!!! As a mother it is my responsibility to ensure that my family is being fed properly. I was raised with a large family garden in which we were fully expected to participate in cultivating. And now I find myself married to a man who when he asks, "what's this?" really means it. Oft times he has never seen the vegetables that I place on his plate. Don't get me wrong, I have lived most of my life in the United States so I don't feed him anything "exotic" by any stretch of the imagination but most vegetables to him, are myths. I understand the "American Diet" and know that I don't serve much of what is on that menu so I find myself improvising, constantly on the search for "what's for dinner." And it is here that I find myself. Every now and again I find a recipe, though not entirely healthy, passes the palate test at my home. One such recipe is so simple and yet so tasty that I was actually able to designate it a "keeper." Who knew good food didn't have to come from a restaurant or a box. Hopefully those two places are not interchangeable.  But I digress. This simple Mongolian Beef recipe fit the bill for an easy weeknight dinner that even my pickiest eater loved. This recipe is adapted from the blogchef who has some great recipes. When it comes to cooking I tend not to follow the recipe exactly. This recipe is easily adapted to what ingredients you may have on hand. Snow peas, sugar snap peas, broccoli, carrots, bell peppers, etc. can easily be substituted or added to this recipe.

Ingredients:
1 lb flank steak
¼ cup cornstarch
2 teaspoons vegetable oil
½ teaspoon ginger (minced)
1 tablespoon garlic (minced)
½ cup soy sauce
1/2 cup water
½ cup brown sugar
2 tablespoons rice wine (or white grape juice)
½ teaspoon red pepper flakes
2 green onions (sliced)
1 medium onion (sliced)
Oil (for frying)


These are the ingredients that I had on hand. First slice the meat across the grain thinly and toss it in the cornstarch. Let it sit for at least 10 minutes. (Don't skip this step.) Heat your pan, add your oil and cook your meat until just past pink on medium heat. Mine only took a few seconds but it will depend on how thinly you slice your meat. Put it on a paper towel to drain off any excess oil. Put the meat aside and combine the sauce ingredients (ginger through rice wine or grape juice) in a small pan and bring to a boil. Set the sauce aside.


Pour off any excess oil from your frying pan or wok except for about a tablespoon. Saute onions or other vegetables for about 2-3 minutes. Add the meat back to the wok and pour the sauce over the meat and vegetables. Toss and cook until incorporated. Serve over rice or rice noodles.


                                     Eve